How to Add a Borehole Log to Your Drawing Using AddoSoft
In the video above, we demonstrate the following steps:
- Entering the depth ranges for our borehole log.
- Copying data from a PDF containing log information and using the Paste Clipboard feature to insert the data.
- Clicking Find Soils to automatically identify the soil types present.
- Clicking Next to proceed with adding the log.
Exploring the Borehole Data Entry Popup

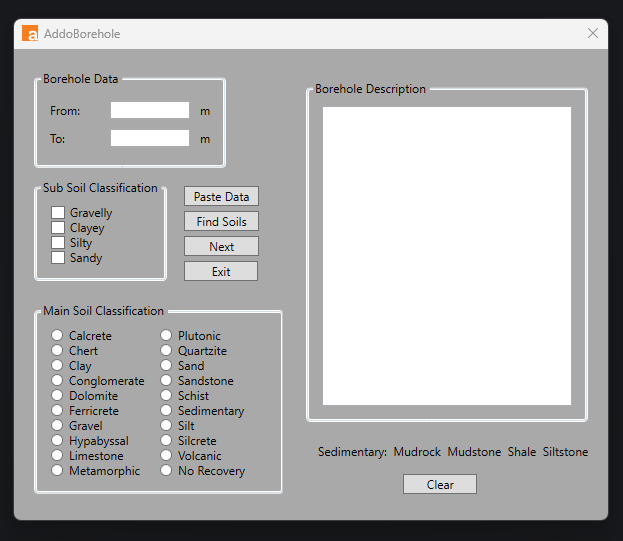
The borehole data entry popup is a streamlined tool for recording and classifying geological information with precision. Designed to simplify the documentation of depth intervals and soil classifications, it ensures efficient data entry while maintaining accuracy. Let’s delve into its sections and features to see how it works.
Borehole Data Section
In the Borehole Data section, users define the depth range to document by entering values in the From and To fields (measured in meters). This range determines the hatch pattern displayed on geological maps, visually representing the borehole layers.
Subsoil Classification
This section allows users to specify one or more subsoil characteristics that best describe the composition within the selected depth range. Options include:
- Gravelly
- Clayey
- Silty
- Sandy
These classifications provide insight into the mixture of materials present, aiding in geological assessments.
Main Soil Classification
The Main Soil Classification focuses on the dominant material in the borehole. Users can choose from common types like Gravel, Clay, and Sand, or more specific materials like Dolomite, Limestone, or Metamorphic. This classification summarizes the borehole's primary composition for a clear geological overview.
Borehole Description
The Borehole Description section is a free-text area where users can log detailed notes and observations for the specified depth range. This flexible input field accommodates information that doesn’t fit into predefined categories, allowing for comprehensive documentation.
Features and Buttons
1. Paste Data
Quickly populate borehole fields by pasting clipboard data. This feature saves time and reduces the chance of errors during manual input.
2. Find Soils
Automatically identify soil types from the borehole description using the Find Soils button. This tool leverages search and pattern recognition to simplify soil classification.
3. Next
Seamlessly transition to the next borehole or depth range with the Next button, keeping the workflow uninterrupted.
4. Exit
The Exit button closes the borehole data entry popup, providing an easy way to leave the logging process when needed.
5. Clear
Reset the borehole description field with the Clear button. This is useful for correcting errors or starting a fresh entry.
