
Importing Points in CAD: Streamline Your Workflow

To begin, click on the "Import Points" icon located in the ribbon or enter "AB_Point" to initiate the process.

A window will open next.
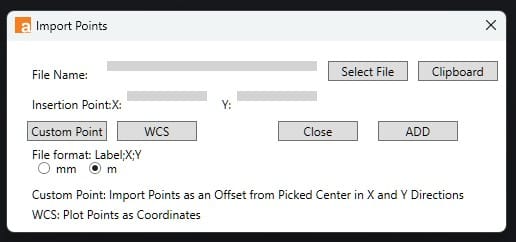
Select File: Opens a window where you can select your CSV or TXT file that follows the format LABEL ; X ; Y.
Custom Point: Prompts you to define a center point to be used as a reference for inserting your points.
This is how the "box.txt" file looks, with points represented as offsets from the center:
0;0;0
A;-1.5;1.5
B;1.5;1.5
C;-1.5;-1.5
D;1.5;-1.5
Video: Watch this clip demonstrating how the Custom Point feature operates.
WCS: This will plot your points in World Space using X and Y coordinates.
This is how the "box XY.txt" file looks, with points defined in world space as XY:
A;7;0
B;10;0
C;10;3
D;7;3
Video: Watch this clip demonstrating how the WCS feature operates.
Units: You also have to define if the points in your list are in mm or m.
After selecting a file and choosing either Custom Point or WCS, click the "Add" button. This action will plot your Points in CAD.
Clipboard: Takes your current copied data and creates a temporary file, which it then selects.
Video: Watch this clip demonstrating how the Clipboard Selection works.
Video: Watch this video demonstrating how boreholes are imported from a text file.